
Products
Recommend Products
Contact Us
| Email: | info@sanchangpump.net |
| Hotline: | +86 181 4266 2779 |
| +86 193 1300 1794 | |
|
Wechat: |
+86 181 4266 2779 |
|
WhatsApp: |
+86 181 4266 2779 |
| Address: | No.517,Xiangfu Road |
| Yuhua District, | |
| Changsha City | |
| Hunan Province, P.R.C |

IR Type Horizontal Single-stage Single-suction Hot Water Pump
Classification:
End Suction Centrifugal Pump
Salt Chemical
Water Conservancy
Key words:
Hot Water Pump
Single-stage Single-suction Pump
Horizontal Centrifugal Pump


Hotline:
- Product Description
- Performance Parameters
- Installation Drawings
- Installation and Operation
- Faults and Solutions
-
- Commodity name: IR Type Horizontal Single-stage Single-suction Hot Water Pump
Flow Range: 5.6~720 m3/h</br> Head Range: 5~125 m</br> Fluid Temperature: <120 ℃</br> Inlet Pressure: ≤ 1 MPa ((Please specify if pressure exceeds 1.0 MPa))</br> Shaft Seal: packing seal, mechanical seal</br> Available Materials: HT200, HT250, QT600, ZG, 304, 316, 316L, 317L, 904L, CD4-MCu, etc</br></br></br>
Product Description
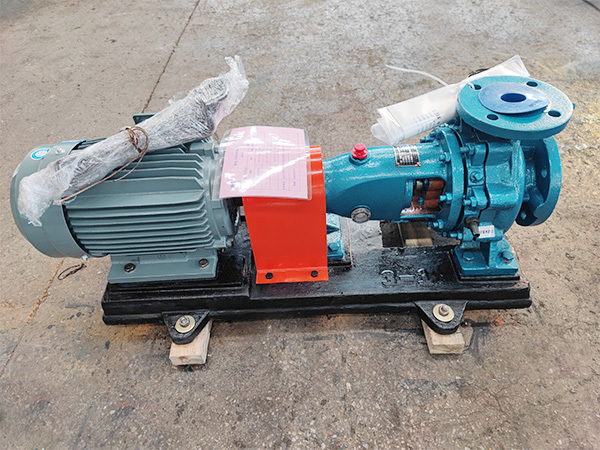
IR type hot water pump is a horizontal single-stage single-suction clean water centrifugal pump. It is applied to industrial, agricultural, urban water supply and drainage, fire water supply and other scenarios, with the applicable medium temperature not exceeding 120 ℃.
Overview
IR(IS) type pump is designed in accordance with the performance and dimensional requirements of international standard ISO 2858. Its technical specifications align with international standards and reach the world advanced level. It is one of the energy-saving pump products promoted nationwide.
Structure Description
This pump features simple structure, reliable performance, small size, light weight, good cavitation resistance and low power consumption, and is easy to operate and maintain.
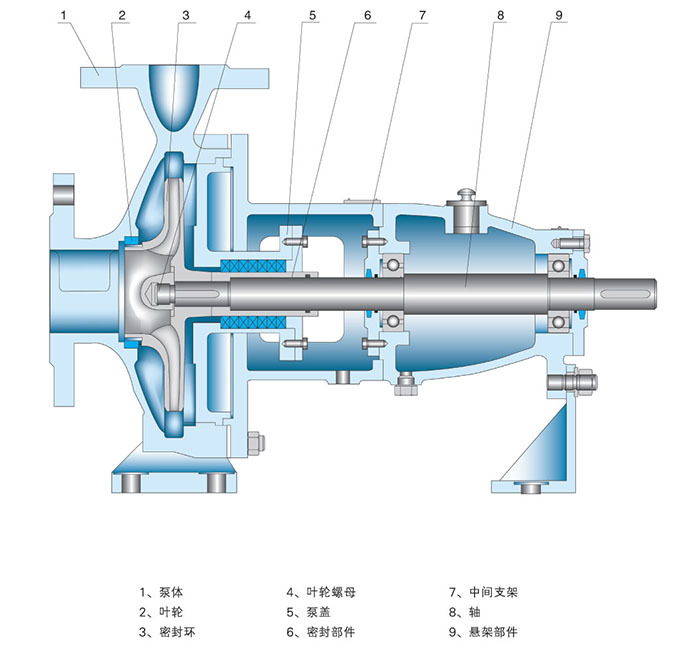
The pump body and pump cover of IR hot water single-stage pump are split at the rear side of the impeller, namely the commonly known rear pull-out structure. It enables convenient maintenance: there is no need to disassemble the pump body, suction pipeline, discharge pipeline or motor. Only remove the intermediate part of the extended coupling, then the rotor assembly can be pulled out for inspection and repair.
The pump casing (pump body and pump cover) forms the pump working chamber. The impeller, shaft and rolling bearings constitute the pump rotor. The bearing bracket assembly supports the rotor, and the rolling bearings bear radial and axial loads generated during operation.
To balance the axial thrust, most pumps are fitted with wear rings on both front and rear sides of the impeller, and balance holes on the rear shroud of the impeller. For pumps with minor axial thrust, no wear rings or balance holes are arranged on the impeller rear side.
The shaft sealing assembly consists of gland packing cover, packing ring and packing, which prevents air ingress and excessive liquid leakage. For impellers equipped with balance holes, the cavity filled with soft packing connects to the impeller suction port. When a vacuum forms at the impeller inlet, air is likely to leak in along the sleeve surface. Therefore, a packing ring is installed in the stuffing box. Pressurized liquid from the pump chamber is guided to the packing ring through small holes on the pump cover for sealing. For impellers without balance holes, the liquid pressure on the impeller rear side is higher than atmospheric pressure, so air leakage will not occur and the packing ring can be omitted.
A shaft sleeve is mounted where the shaft passes through the stuffing box to protect the shaft from wear. An O-ring is installed between the shaft sleeve and the shaft to prevent air ingress and liquid leakage at the mating surface.
The pump is connected to the motor via an extended flexible coupling. Viewed from the drive end, the pump rotates clockwise.
Model Description
IR100-80-160A
IR -- Horizontal Single-stage Single-suction Centrifugal Pump
100 -- Pump inlet diameter, 100 mm
80 -- Pump outlet diameter, 80 mm
160 -- Nominal diameter of impeller
A -- Code for impeller trimming (B, C, etc. for further trimming in sequence)
-
Flow Range: 5.6~720 m3/h
Head Range: 5~125 m
Fluid Temperature: <120 ℃
Inlet Pressure: ≤ 1 MPa ((Please specify if pressure exceeds 1.0 MPa))
Shaft Seal: packing seal, mechanical seal
Available Materials: HT200, HT250, QT600, ZG, 304, 316, 316L, 317L, 904L, CD4-MCu, etc
-
-
Assembly and Disassembly
Prior to assembly, inspect all parts for defects that may affect assembly and thoroughly clean them.
1. Pre-tighten all connecting bolts, pipe plugs and other fasteners onto corresponding parts in advance.
2. Pre-install O-rings, paper gaskets, wool felt and other accessories onto respective parts.
3. Assemble wear rings, packing, packing rings and gland packing covers into the pump cover in sequence.
4. Mount rolling bearings onto the shaft, then fit the shaft assembly into the bearing bracket. Install the cover to secure the bearings, and fit connecting bolts onto the shaft.
5. Install the shaft sleeve on the shaft, then mount the pump cover onto the bearing bracket. Fit the impeller, lock washer and impeller nut and tighten them securely. Finally, install the entire assembly into the pump body and fasten the connecting bolts between the pump body and pump cover.
Special attention shall be paid to small parts such as flat keys, oil retainers, water retainers and O-rings inside shaft sleeves to avoid missing parts or incorrect assembly sequence.
Disassembly shall be carried out basically in the reverse order of assembly.
Installation
Proper installation is critical to the pump's operation performance and service life. All installation and alignment work shall be performed carefully. Refer to relevant outline and installation dimensions.
1. Installation and Alignment
1). Remove grease and dirt from the base, then place the base on the foundation.
2). Check the levelness of the base with a level gauge. Wedge blocks can be used for levelling.
3). Pour cement into the base and anchor bolt holes.
4). After the cement is fully cured, check for looseness of the base and anchor bolts. Tighten the anchor bolts if conditions permit, and recheck the levelness.
5). Clean the supporting surface of the base, the foot surfaces of the pump and motor, then mount the pump and motor onto the base.
6). Maintain a proper gap between the two couplings. Check the concentricity of the pump shaft and motor shaft, and adjust with thin gaskets if needed.
The radial runout of the coupling outer circle (top, bottom, left and right) shall not exceed 0.1 mm. The maximum deviation of the end face gap around the couplings shall not exceed 0.3 mm.
2. Installation Instructions
1). The installation height of the centrifugal pump, as well as the length, diameter and flow velocity of pipelines shall comply with calculation requirements to minimize unnecessary energy loss.
2). Select larger pipe diameters for long-distance transmission. All pipelines shall be supported independently. The pump shall not bear the weight of pipelines to prevent damage.
3). If a check valve is installed on the discharge pipeline, it shall be mounted on the downstream side of the gate valve.
Start-up, Shutdown and Operation
1. Start-up
1). Verify the rotation direction of the motor and ensure the pump runs flexibly before coupling connection.
2). Close the gate valve on the discharge pipeline.
3). Prime the pump with water, or use a vacuum pump for water filling.
4). Switch on the power. After the pump reaches rated speed, gradually open the discharge gate valve and adjust to the required operating condition. The pump shall not run for more than 3 minutes continuously with the discharge gate valve fully closed.
2. Shutdown
1). Gradually close the discharge gate valve, then cut off the power supply.
2). Drain all liquid inside the pump if the ambient temperature is below 0 ℃ to prevent frost cracking.
3). If the pump will be out of service for a long time, disassemble, clean, lubricate, pack and store it properly.
3. Operation
1). During start-up and operation, constantly monitor instrument readings, bearing temperature, packing leakage and temperature, as well as pump vibration and abnormal noise. Troubleshoot immediately once any abnormality is found.
2). The maximum bearing temperature shall not exceed 80 ℃, and the temperature rise relative to ambient temperature shall not exceed 40 ℃.
3). Slight and even leakage from the packing is considered normal.
4). Keep the lubricant level within the specified range; do not overfill or underfill. Top up lubricant in a timely manner when the level is low.
5). Replace the wear ring when excessive wear occurs at the mating surface between the wear ring and impeller.
-
Fault Symptom Cause of Fault Troubleshooting Method 1. Pump does not deliver water a. Inlet/outlet valves not open, blocked pipelines, or blocked impeller flow passage.
b. Wrong motor rotation direction, or slow speed due to motor phase loss.
c. Air leakage in the suction pipe.
d. Pump not fully primed, air trapped in the pump chamber.
e. Insufficient inlet water supply, excessive suction lift, or foot valve leakage.
f. Excessive pipeline resistance or improper pump selection.
a. Inspect and remove blockages.
b. Correct motor rotation direction and tighten wiring connections.
c. Tighten all sealing surfaces to eliminate air leakage.
d. Fill the pump with liquid, open the vent valve to purge all air.
e. Shut down the pump for inspection and adjustment (this often occurs when connected to municipal water lines or used with high suction lift).
f. Reduce pipeline elbows and select a more suitable pump.
2. Insufficient pump flow a. First check causes listed in Item 1.
b. Partial blockage in pipelines/pump flow passages/impeller, scale buildup, or insufficient valve opening.
c. Low voltage.
d. Impeller wear.
a. First follow troubleshooting steps in Item 1.
b. Remove blockages and readjust valve opening.
c. Stabilize the voltage.
d. Replace the impeller.
3. Excessive power consumption a. Operating beyond rated flow.
b. Excessive suction lift.
c. Worn pump bearings.
a. Adjust flow rate by partially closing the outlet valve.
b. Reduce the suction lift.
c. Replace the bearings.
4. Noise and Vibration
a. Unstable pipeline supports.
b. Gas entrained in liquid.
c. Cavitation occurs.
d. Damaged bearings.
e. Motor operates under overload and overheats.
a. Secure the pipelines.
b. Increase suction pressure and vent gas.
c. Reduce vacuum level.
d. Replace bearings.
e. Adjust according to Item 5.
5. Motor Overheating
a. Excessive flow rate leading to overload operation.
b. Mechanical friction and interference.
c. Damaged motor bearings.
d. Insufficient voltage.
a. Throttle the outlet valve.
b. Inspect and eliminate faults.
c. Replace bearings.
d. Stabilize voltage.
6. Water Pump Leakage
a. Worn mechanical seal.
b. Sand holes or cracks on pump body.
c. Uneven sealing surface.
d. Loose mounting bolts.
a. Replace the component.
b. Weld repair or replace the pump body.
c. Refinish the sealing surface.
d. Tighten the bolts.
Next Page
Customer Case
Send Inquiry
If you are interested in our products, please leave us a message and we will reply to you as soon as possible, thank you!



Hunan Sanchang Pump Co., Ltd.
| Email: | info@sanchangpump.net |
| Hotline: | +86 181 4266 2779 |
| +86 193 1300 1794 | |
| Mobile/Wechat/WhatsApp: | +86 181 4266 2779 |
| Address: | No.517,Xiangfu Road, Yuhua |
| District, Changsha City | |
| Hunan Province, P.R.C |
